Alerts
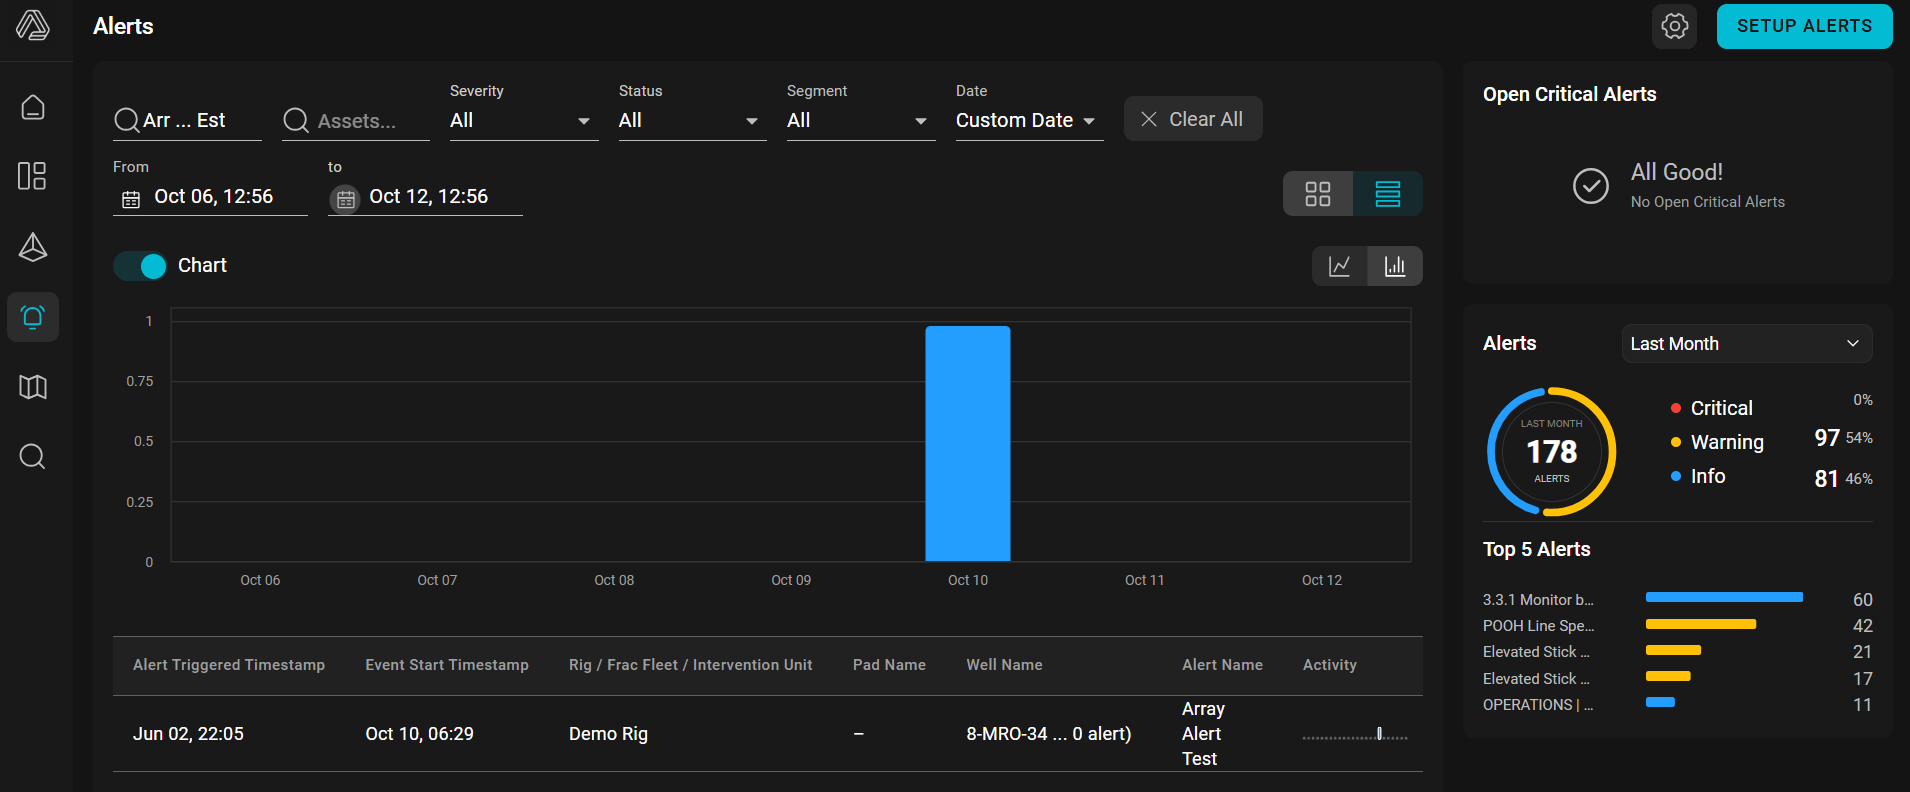
Alerts in Corva are automated notifications that fire when something important happens with an asset, operation, or process. Instead of having a person stare at dashboards waiting for a value to cross a limit, equipment behavior to change, or an unusual condition to appear, an alert watches for those conditions and notifies the right people when action may be needed.
Alert may be triggered only on an active well.
A typical alert answers three questions:
- What are we watching? A specific data point (for example, hook load or downhole MSE) or an event produced by a backend app.
- When does it fire? When the data matches a rule you define, or when your backend app explicitly reports that an event happened.
- Who gets notified, and how? The subscribers and notification channels configured for the alert.
Why use alerts
- Proactive monitoring — catch anomalies and operational issues as they happen instead of after the fact.
- Less manual watching — no need to continuously monitor dashboards; the alert engine does it for you.
- Faster response — notifications reach the right people immediately, shortening reaction time.
- Automation — conditions are defined once (in the UI or in code) and evaluated consistently, every time.
Setting Up Alerts
To create or manage alerts, open the Alerts page and click Setup Alerts in the top-right corner.
From the alerts setup view, click + New Alert. You can then choose one of two options:
From Template — start with a predefined alert configuration and adjust it as needed.
From Blank — create a new alert manually by defining the name, segment, check type, rules, thresholds, recurrence, and notification settings yourself.
Alert Check Types
Alerts in Corva differ by their Check Type: Event Based and Time Based.
Event Based Alert
Event Based alerts are triggered by a backend application. The user defines the event logic inside their BE app, and when something important happens, the app explicitly triggers the alert.
For example: "Pressure anomaly detected" → BE app sends an event → Corva creates an alert.
These alerts do not use UI rules, because the condition is defined in code.
Event Based Alert Definition UI
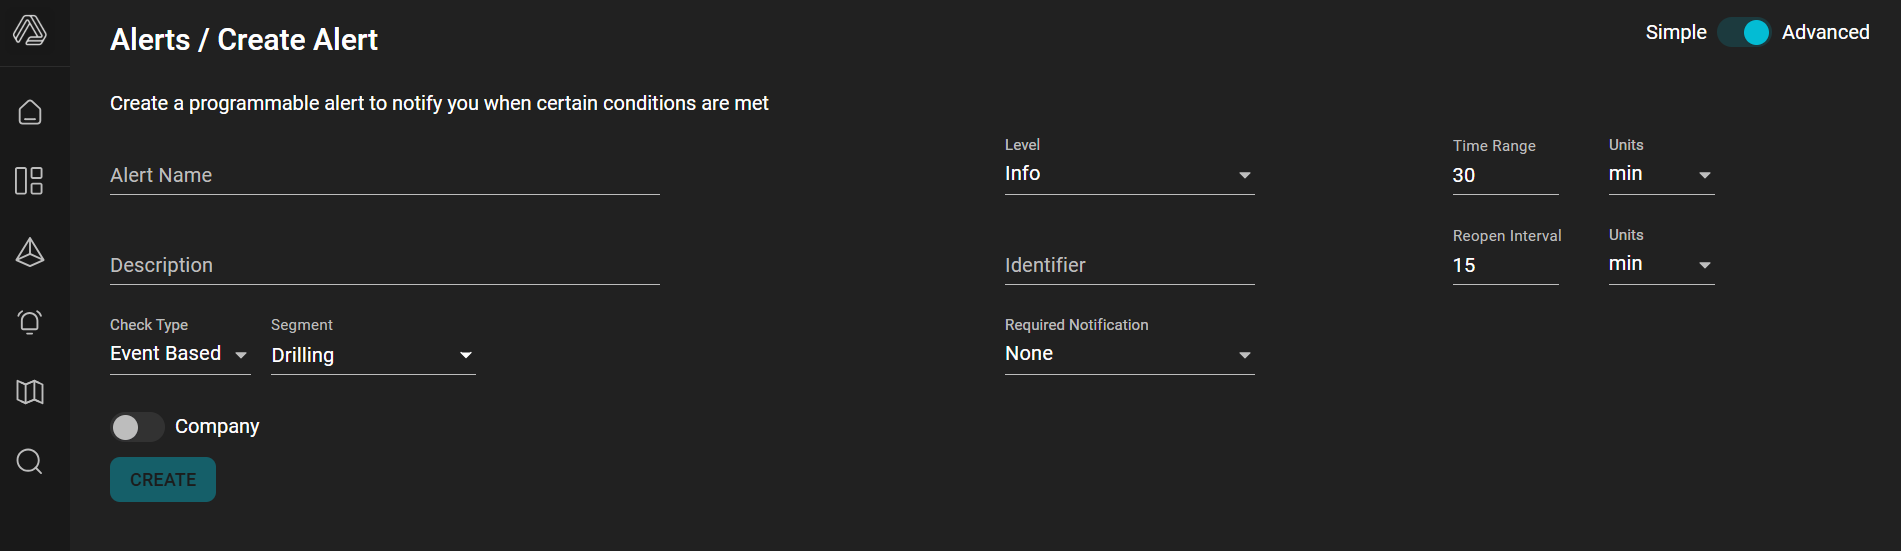
The Event Based alert definition is used when an alert is triggered by a backend app, not by Corva's scheduled rule engine. That is why there is no Rules section in this UI; for event alerts, the app decides when the event happens.
| UI Element | Meaning |
|---|---|
| Alert Name | User-facing name of the alert. This is what users will see in the Alerts section. |
| Description | Optional explanation of what the alert represents. |
| Check Type | Defines how the alert is triggered. Here it is set to Event Based, meaning the alert is triggered by an external/backend event. In the UI, when checkType is an event, Corva shows Identifier instead of recurrence/rules. |
| Segment | The operational segment this alert belongs to, for example Drilling. |
| Company toggle | Controls whether the alert is personal or company-wide, depending on permissions. |
| Level | Alert severity: Info, Warning, or Critical. |
| Identifier | The key field for event alerts. The backend app must send the same identifier when triggering the alert. Corva uses it to find the matching event-based alert definition. |
| Required Notification | Notification channels that must be used for this alert. None means no required channel is selected. |
| Time Range | It's how much of a time window of data we look at. You could also think of it as a lookback window. This is more relevant to time-based alerts than to event-type alerts. |
| Reopen Interval | Cooldown before the alert can reopen or be reused again. See sections on Time Range and Reopen Interval in the Time Based alerts chapter. |
| Units | Time units for Time Range and Reopen Interval, such as minutes. |
For developers, the important part is: the Identifier in this UI must match the identifier sent by the backend app when calling the event alert trigger API.
Please see the following tutorials on Event check type alerts:
Time Based Alert
Time Based alerts are triggered by Corva's API alert engine. They are configured through the Corva UI using rules, constraints, time range, recurrence, and check interval.
For example: "Check hook load every 30 minutes and alert if it matches the rule."
In this case, the user defines the condition in the UI, and Corva periodically evaluates it.
Time Based Alert Definition UI
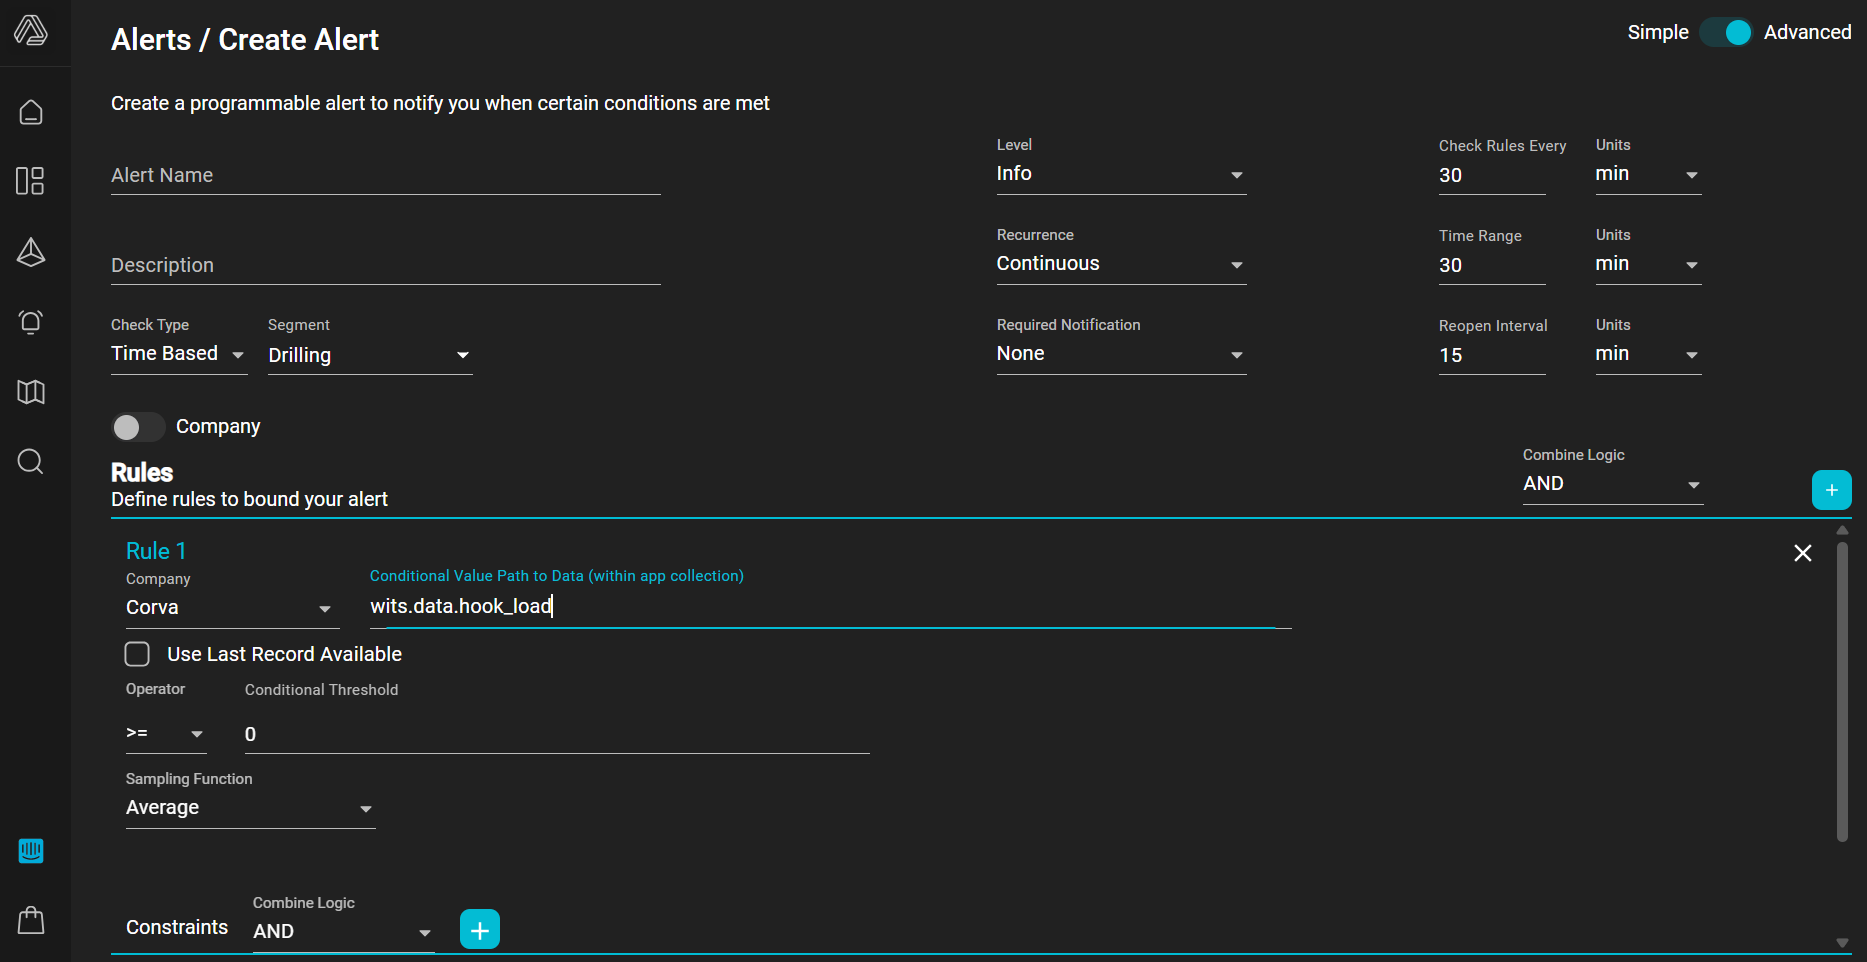
A Time Based Alert is a scheduled rule evaluator: Corva checks selected data over a recent time window, applies your rule logic, and opens/updates/closes an alert depending on whether the rules match.
Top-level alert settings
Alert Name / Description
Human-readable title and explanation. Name is required; description helps subscribers understand what the alert means.
Check Type = Time Based
Means the alert is evaluated on a schedule. In the UI, Time Based and Event Based are two separate modes. For time alerts, rules are rendered and evaluated; event alerts use an identifier instead.
Segment
Defines which operational domain/assets the alert applies to, for example Drilling. It also affects which data paths are offered in simple/advanced modes. The UI resets rules when segment changes.
Level
Alert severity: for example Info, Warning, Critical depending on configured levels. The default is INFO. The level is sent to the API as level.
Recurrence
Recurrence controls how often the same alert is allowed to trigger.
| Option | Meaning |
|---|---|
| Continuous | Alert can keep triggering/updating while the condition keeps happening. Best for ongoing conditions. |
| Once Per Asset | Triggers only once for each asset/well. After it has alerted for that asset, it will not alert again for the same asset. |
| Once | Triggers only once total for this alert definition, regardless of asset. |
| Periodic | Can trigger repeatedly as separate notifications/occurrences, useful when you want repeated reminders instead of only one ongoing alert. |
Required Notification
Forces selected notification channels/types to be required for this alert. The UI allows multiple selected notification types and renders None when no required type is selected.
Time Range
It's how much of a time window of data we look at. You could also think of it as a lookback window. For example if you set it to 50 minutes, it'll find all the data over the course of 50 minutes whenever the alert is checked.
This is more relevant to time-based alerts than to event-type alerts.
Check Rules Every
This determines how frequently the alerts engine wakes up and checks the alert definition. So if you have Check Rules Every 10 minutes and a Time Range of 50 minutes, that means that every 10 minutes the alert engine will check the previous 50 minutes of data.
Reopen Interval
The idea here is that instead of making a brand new alert, it'll reuse an existing alert, if it's within the reopen interval. So for example if the conditions for an alert are happening continuously, it will just reuse the same alert instead of making a new one.
Company toggle
Controls whether the alert is personal or company-wide, depending on permissions.
Rules section
A Rule is the actual condition Corva evaluates. Each rule says:
take this data value → summarize it over the Time Range → compare it to this threshold → optionally only include records matching constraints.
For example, a rule might be:
torque-and-drag.predictions.downhole_mse >= 20, sampled by % Change.
The default new rule in this UI is exactly that data point, operator >=, threshold 20, sample function % Change.

Company
This dropdown allows you to choose the provider of the dataset used to retrieve the conditional value path.
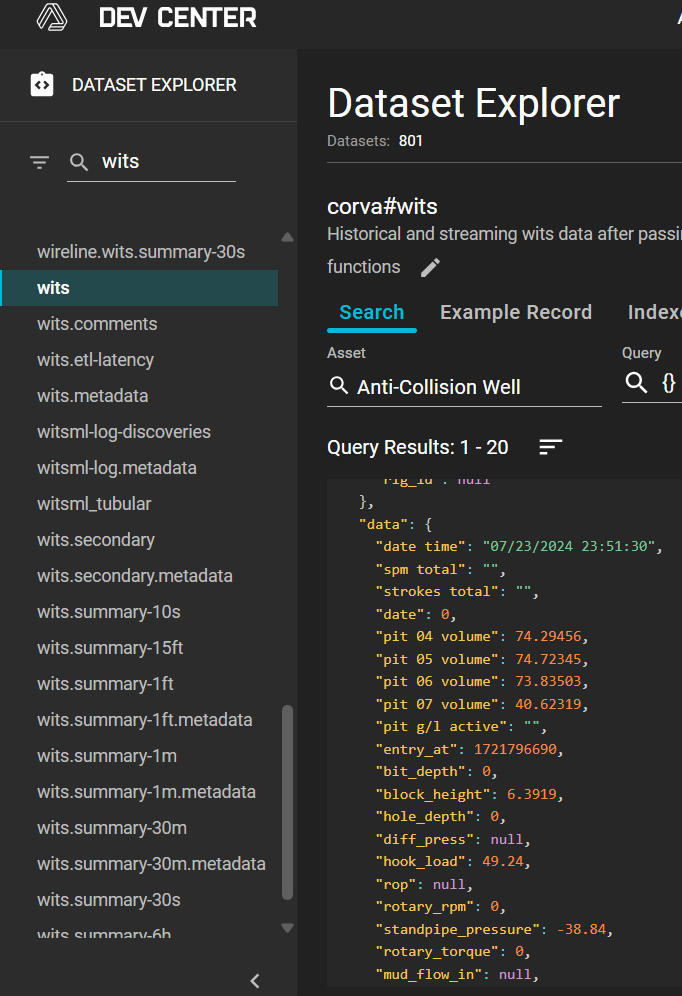
Conditional Value Path to Data
The Conditional value path to Data is the path to a field (data point) in a dataset. For example, wits.data.hook_load means the hook_load property within a data object in the wits dataset. As for suggestions when typing a path, this is not always available — setting up the path to a data point may require typing it manually.
Use Last Record Available
When checked, Corva queries only the latest available record instead of aggregating the full Time Range. Use this when the condition is "current/latest state is X." Do not use it when you need an average, max, median, count, or trend across the whole Time Range.
Operator
Comparison operator between the calculated value and threshold. Supported comparisons include:
=, !=, ~, !~, >, >=, <, <=, in, !in.
The backend evaluates the sampled value against the threshold with these operators.
Conditional Threshold
The value to compare against. It can be a simple number/string.
Sampling Function
Corva Alerts use sampling functions to turn the many records inside the configured Time Range into one value that can be compared against the rule threshold. The backend first gets records for the period, applies constraints, then runs the selected sample_function on the remaining data.
In other words, the rule is not usually comparing every raw record directly. It first summarizes the data from the Time Range using the selected sampling function, then compares that summarized result to the threshold.
This does not apply when Use Last Record Available checked.
| Sampling function | What it does | When to use it |
|---|---|---|
| Average | Calculates the mean value across valid records in the Time Range. | "Normal behavior over the window," smoothing out noise. |
| Median | Sorts values and returns the middle value. | When spikes/outliers should not dominate the alert. |
| Count | Counts how many records exist after constraints are applied. | "Did this happen enough times?" or "is data present?" checks. |
| % Change | Compares the beginning of the Time Range to the end of the Time Range and returns the percentage increase/decrease. | Trend alerts: "is this value rising/falling quickly?" |
| Minimum | Returns the lowest value in the Time Range. | When any low dip matters. |
| Maximum | Returns the highest value in the Time Range. | When any high spike matters. |
| Any Match / Value | Returns the set of matching values, and the rule passes if any value satisfies the operator/threshold. | When one matching sample is enough to alert. |
Example:
WITS bit_depth > 10000, Time Range = 30 min, Sampling Function = Maximum
means: look at all valid bit_depth records from the last 30 minutes, take the highest value, and alert if that highest value is greater than 10000.
Combine Logic for Rules
This controls how multiple rules combine.
AND means all rules must match.
OR means at least one rule must match.
Require Match (with OR logic)
When Combine Logic is OR, the Require Match checkbox makes a specific rule mandatory.
Normally with OR, the alert fires if any one rule matches. But when Require Match is checked on one or more rules, the condition becomes:
Alert if at least one non-required rule matches AND all required rules match.
Example:
| Rule | Require Match | Result |
|---|---|---|
Rule 1: Distance to plan >= 0 | Yes | Must be true |
Rule 2: DLS > 5 | No | Either Rule 2 or Rule 3 must be true |
Rule 3: Bit depth > 10000 | No | Either Rule 2 or Rule 3 must be true |
So the alert condition becomes:
Rule 1 AND (Rule 2 OR Rule 3)
In plain language: Require Match lets you add mandatory conditions inside an OR group.
Constraints
A Constraint is a row-level filter applied before the sampling function. For example, you might add:
wits.data.hook_load > 100
That means Corva should only consider records where wits.data.hook_load > 100 when calculating the rule value.
Constraints have their own Combine Logic:
AND: every applicable constraint must pass. OR: at least one applicable constraint must pass.
The backend applies constraints before sampling: it filters dataset records with constraints, then applies the sampling function. Constraint logic itself is evaluated as AND/OR in the parser.